Things To Do When You’re Bored

Things To Do When You’re Bored

There are so many things you can do when you’re bored. Most of the time I’m always bored so I came up with this list of what to do when you’re bored.

Art ideas

 You can draw if you don’t like to draw, you can paint if you don’t know what to paint. Get out some water colors and paint the whole page not in any specific way. Take a pen or fine detail marker and start writing some words after the page is dry though.

Cooking

 If you don’t like to draw or do art you can bake something or cook something you can look on Pinterest or just about any website and find a recipe.

Building and decorating

 If you really hate to cook/bake, build a fort. Forts are super fun to chill in, they are great to watch movies and shows in and you can make it how big or small you want it. You can decorate it to your liking, just remember to clean up when done or your mom might get mad at you. 

Add a friend

If you don’t like any of the things on the list so far, you can go ask a friend if they want to hangout and do something. (of course you can do any of these things with friends)

Bracelets

 If you want to do something by yourself that’s OK you can make bracelets whether that’s string bracelets or beaded bracelets if you don’t have a big attention span the beaded bracelets are definitely something you should consider.
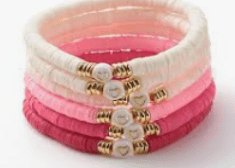
picture of bracelets 

(bracelets)

New things

 You can look online and learn how to do something you’ve never done before like, crochet, knit, ride roller skates/ roller blades, etc. If you have a dog you can take your dog on a walk, teach them new tricks, or just play with them. You can learn how to do tricks that you’ve never done before like cartwheels, one handed cartwheels, back bends, round off, Ariel, etc. This would be nice because it’s not something you can learn super fast; it takes lots and lots of time to do. If you ever just don’t know what to do you can try a new trick. You can make up a fun little dance to show your mom or dad, your friends, siblings, or just for yourself.

 If you have a lazy dog you can snuggle with them. 

Beauty

If you don’t have a dog or a pet, you can play with makeup and experiment. If you don’t like makeup or don’t have any, do your nails. Doing nails is something that has endless creativity, you can do so many designs and have so much fun. You can do your own spa like a face mask, DIY sugar scrubs or anything you want.

Make something

If you don’t want to you can play with play dough or make play dough. Making play dough is super easy. You can find a recipe for it on google. Playing with play dough is just as fun cause you can make anything you want you can make food, people just play with it in your hands, make little shapes, etc. you can do anything with play dough it has no limits to what it can do it’s your creativity and you can pick what you do.. You can make slime, if you don’t have the ingredients to make slime you can find a tutorial on YouTube, google, Pinterest, etc. 

Writing

You can write a story, whether that’s real or fake you can choose it to your liking. You can make it funny, scary, or action.

 As you can see, there are so many different things to do when you’re bored you don’t have to always be bored you can do anything you want.

The Best Mac ‘n Cheese

Food: everybody loves it. Some eat food as comfort while others eat it because they love it. Even if you don’t love it as much as others you still have to eat it. Anyways here is why I think that mac n cheese is one of the best foods ever.

 I think that Kraft mac’n cheese is one of the best foods ever. Not just Kraft I think that mac’n cheese is one of the best foods ever. Kraft has been around for years! Kraft’s mac n cheese is also super easy to cook. I bet that if you were to ask people when they are running late most of them would say mac n cheese. I know that at my age this is one of the only things I make myself. When my parents go on a date night I usually make mac n cheese. I know that college students love mac n cheese. Well, Kraft cannot compare to red robin’s mac n cheese.

Red Robin has some of the best mac n cheese I have ever had. Its thick creamy consistency. It may take a while to take but the wait is worth it. While you are waiting for it, they will bring you some french fries and homemade fry sauce. The mac n cheese comes out it has a bittersweet taste. It has a sweet and tart taste. If you want to mix it up, add some salt and it will turn into a different taste. If you don’t have enough time to wait for it here is another alternative. 

Stouffer’s microwave mac n cheese is super easy to make. This is one of the easiest dinners to make. All you have to do is take off the clear plastic and put it in the microwave and heat it. It has a sweet and creamy taste. If you add salt to it and it will be a different taste this is one of my favorite mac n cheese I have ever had. 

There are some of my all-time favorite mac n cheese I had ever had I recommend all these mac n cheese. I promise that you will like them. Plus most of them are super easy to make. I hope that you will like one of these just as much as you liked them.


Harry Potter Inspired Recipes!

ButterBeer

Butter Beer is one of the most common recipes and treats in the wizarding world. It is really tasty! Plus it is really easy to make! You can serve it frozen or liquid. Prep time is 10 minutes, and the total amount of time it should take is 60 minutes if it is frozen but only about 10 minutes if it isn’t frozen. It makes about 4 servings.


What you’ll need:

-Cream Soda

-¼ Cup of Butterscotch Syrup

-1 Cup of Heavy Whipping Cream

-2 Teaspoons of Vanilla Extract

-¼ Cup of melted butter

-2 Tablespoons of Sugar


Steps:

1~ Combine the cream soda and butterscotch syrup in a bowl and stir it.

2~Now, beat the heavy whipping cream in a stand mixer (or however you prefer) and beat until it forms a peak. 

3~ Once the whipped cream is formed, add the sugar and vanilla. Once mixed, stir in the melted butter.

4~Put the cream soda and butterscotch mixture into cups and add the whipped cream on top.

5~ Enjoy!


Chocolate Frogs

Chocolate frogs are very simple and very delicious. They are very famous for having cards with wizards and witches on it.  It takes about 7-10 minutes to prepare. Then it takes about 1-2 hours to freeze. This recipe should make about 16 frogs. 


What You’ll Need:

-Chocolate frog molds

-2 Cups of Chocolate

-8 Tablespoons Heavy Whipping Cream (You might not need it all)


Steps:

1~ Combine the chocolate and heavy whipping cream together in a bowl and put it in the microwave for one minute and stir

2~ Put it in one minute at a time until it is fully melted.

3~ Pour the melted chocolate into the chocolate frog molds.

4~ Place the filled chocolate frog molds into the freezer for 1-2 hours or until solid.

5~ You now have delicious chocolate frogs.


Harry Potters Birthday Cake:

This is a classic. The point of this cake is for it to look messy yet professional. Even though it looks messy, it is still very delicious. Prep time is 20 minutes. Cook time for the cake is about 28 minutes. So the total time of making it will take about 48-50 minutes.


What you’ll need:

-1 box of chocolate or vanilla cake mix

(if you want then you can make your own cake)

-3 Eggs

-½ Cup of Vegetable Oil

-1 ⅓ Cups of Water

-1 ½ Cups of Softened Butter

-1 ½ Teaspoons of Vanilla Extract

-6 Cups of Confectioners Sugar/Powdered Sugar

-3 Tablespoons of Milk

– Red, Green, and Blue Food Coloring

Steps:

1~ Preheat the oven to 350 degrees fahrenheit. Put wax paper in the bottom of 2 circle pans and grease with butter, cooking spray, or oil.

2~In a bowl, combine the cake mix, eggs, vegetable oil, and water. The amount of each ingredient could vary depending on your cake mix.

3~Pour the batter into the two pans and pour it about halfway  and make them even. Place it in the oven for 28 minutes.

4~ While the cake is in the oven, combine the butter, vanilla, confectioners/ powdered sugar, and milk. This will be your frosting.

5~Seperate about ½-1 cup of the frosting into a seperate bowl and add the green food coloring until you get your desired shade.

6~Now, add about 1-2 drops of the blue food coloring and a lot of red until you get your wanted shade of pink.

7~ Layer the cakes on top of each other by adding the pink frosting in the middle. Then cover the whole cake with the pink frosting. ( You can do as much or as little as you want as long as it covers the whole cake with pink frosting)

8~Now carve the “cracks” made by hagrid to make it look more realistic.

9~Put the green frosting into a plastic bag and cut a smallish hole at the top so then you are able to write the words “Happee Birthdae Harry” with the frosting.”


Sherbet Lemon

Sherbet lemons are one of Albus Dumbledore’s favorite treats! Prep time is 20 minutes. Cook time is 20 minutes. Which means that the total time for this recipe is about 40 minutes. This recipe makes about 20 individual candies. 


What you’ll need:

-1 Cup of Granulated Sugar

-¼ Teaspoon Cream of Tartar

-½ Cup of Water

-1 Teaspoon of Citric Acid and ½ Teaspoon for Coating

-Yellow Food Coloring

-½ Teaspoon of Lemon Extract

-½ Cup of Confectioners/ Powdered Sugar


Steps:

1~Prepare a place where you can grease it so things will not stick to it.

2~In a small pot, add water, sugar, and cream of tartar. Place it over medium heat. Once the bubbles start to become thick, check the temperature.

3~The temperature should be at around 300-310 degrees fahrenheit. Once it reaches that temperature, take it off the heat and add the yellow food coloring, the lemon extract, and the 1 teaspoon of the citric acid.

4~ Now, you can start shaping it to whatever you want it to be. ( if the candy ends up too hard, place it into the oven until it is soft.)

5~Now you can coat the candies with the citric acid and wrap it into parchment paper/ wax paper.


I hope you enjoy these delicious Harry Potter inspired recipes!

Tips and Tricks for Baking

We all love at least one dessert. I mean I love to make them. Well, making them I have made many mistakes like greasing the pan. That is a little mistake but can lead to a big problem. So I am going to help you so you hopefully don’t make the same mistakes that I did.

Preheat the oven

Before you do anything make sure to preheat the oven. If you don’t you will have brownies that are ready to go in the oven but the oven is not hot enough. 

When the oven is hot enough you will only want to open the oven door twice. Once when you put whatever you are making in the oven. Then the second time when you are pulling it out. Every time you open it, it lets out all the warm air and cold air goes in. So then the oven has to reheat itself. Which should not take very long since the oven has been preheated. If that happens every ten minutes whatever you are baking will never get baked. This brings me to the temperature your ingredients should be.

When Mixing and Measuring 

Next, when you are mixing your ingredients all your ingredients need to be around room temperature. Which is about 68 – 70 degrees Fahrenheit. This is important because if you have melted butter and cold milk the butter is going to solidify itself because the butter is becoming cold again. You do not want that to happen because then when you are trying to mix the ingredients it will be really hard because every other thing is liquid but the butter. When everything is around the same temperature your milk can’t help the butter solidify. 

Another thing is always to be careful when measuring your ingredients. Make sure that when you are measuring that your ingredients are full but not packed down. The only time that you should pack down the thing you are measuring is if the recipe says you should. When a recipe says about one cup that means that they did not fully pack down whatever they are measuring. 

When you are getting ready to make something you should always pick out a dish or pan as one of the first things, here’s why. When picking out a dish or pan you want to make sure that it is the right size. You don’t want a pan or dish that is too small so the batter is overflowing, but you don’t want a pan or dish too big so the batter doesn’t cover it. This brings me to what color your pan or dish should be.

You also want to see if the pan or dish is light or dark. If the pan is dark you probably want to cook it for a little less. The dark pan will absorb the heat more than light will. So if your pan is light you will want to turn up the temperature or cook it for longer. So if I have a white pan full of brownie batter and a navy blue pan full of brownie batter. I will probably put the navy blue one on the bottom shelf and the white one on the top shelf. I can now cook both of them at the same time. You will want to take out the navy pan before the white pan though.

Always follow the recipe 

Next when you are baking do not try to double a recipe. What you want to do is measure and stir separately then cook in different pans. Here’s why you don’t want to. It would suck if you had started to make this great cake and when you decide to double it and then you add too much flour.  Well, when you are mixing them in different bowls you won’t have this problem because you can just scoop up the flour. Also if you are pouring the recipe which you doubled into a pan you have to guess how much to put in the pan but if you just make them separately you won’t have to do that. 

Another thing that I have learned the hard way is to make sure to read your recipe many times before making anything.  One time my brother and I decided to make a cake and we started to read the recipe but did not finish. It said to add salt but to mix in a teaspoon in with the glaze. Instead, my brother and I mixed a tablespoon in with the cake. I think we put more than a tablespoon in by accident. So the cake was very bitter but at the same time, it was sweet. 

Also, make sure you are using measuring cups. The one time my sister and I didn’t, we messed up the shortcake super badly.  My sister switched around the cake flour and the powdered sugar so we had more cake flour than we did sugar so make sure to measure your ingredients and read the recipe.

Now that you have learned all about my mistake and what happens if you do make them. I hope that you don’t end up making them. So the next time that you decide to make something you should try these tips and tricks out.


What are Cronuts?

When I first heard the word and description of cronuts I was amazed and I am so excited to tell others like you about them! Cronuts are a croissant and donut in one it has the texture of a croissant and shape and toppings like a donut. You may find cronuts in bakeries or cafes. 

 You should read this article to learn about why cronuts are such amazing treats or if you are interested in baking to find a new recipe and it’s culture.


 How it came to be…

 In 2013, bakery owner Dominique Ansel created the pastry out of dough similar to a croissant with flavored cream inside. The Cronut was introduced on May 10, 2013, at Ansel’s bakery, Dominique Ansel Bakery, in New York’s Soho neighborhood. These delicious treats soon became very popular and the bakery soon saw hundreds of people lining up to get their hands on the delicious treats called cronuts. Traffic to the bakery’s website increased by more than 300 percent. A star had been born.

And How did he do it all?

Every batch of cronuts he made took around 3 days to prepare! Day one- mixing the dough and leaving it to sit/rise overnight, Day 2- Butter is incorporated and hundreds of dough are layered together for it to rise again, Day 3- the dough is cut, formed into the Cronut shape, and left to rise again. Once each has tripled in size, Cronut by Cronut is fried in grapeseed oil, filled with cream, rolled in sugar, and finished with a glaze.

In his bakery, the daily cronut output is about 360! Also on an average day, there are 60-100 people in line for a cronut. Ever since he started selling this magnificent treat he comes out with a new flavor of filing. Such as Sweet Clementine Ricotta, Peanut Butter Rum Caramel, Lemon Maple, and Brown Sugar Rhubarb. 

Cronuts now:

 Ansel’s first international bakery opened in Tokyo in 2015, and another international outpost—this time, in London—will open this summer. Thus the Cronut, for all its imitations, iterations, and bidding wars, shows no signs of stopping. 

 https://www.cntraveler.com/stories/2016-05-09/the-complete-history-of-the-cronut

Now the fun part:

Here is one of the more current recipes.

5 hours 14 servings 240 calories

  • 2 ¼ teaspoons of active dry yeast
  • 1/2 cup warm water 
  • 1 teaspoon fine salt
  • 2 1/2 tablespoons white sugar, or more to taste
  • 1/2 cup milk
  • 2 tablespoons butter, melted
  • 1 teaspoon vanilla extract
  • 1 large egg
  • 1/8 teaspoon freshly grated nutmeg
  • 1 pound all-purpose flour
  • 12 tablespoons butter at room temperature, divided

Instructions:

  1. Place yeast into the mixing bowl of a large stand mixer. Whisk in warm water and let stand until creamy foam forms on top, about 5 minutes. Add salt, sugar, milk, 2 tablespoons melted butter, vanilla extract, egg, and nutmeg. Whisk the mixture thoroughly. Pour flour on top of liquid ingredients. Place mixing bowl onto the mixer.
  2. Attach the dough hook to the mixer and knead on low speed until the dough comes together in a ball and becomes soft and sticky, about 3 minutes. The dough will stick to the hook and pull away from the side of the bowl.
  3. Transfer dough to a floured work surface, knead 2 or 3 times and shape into a ball. Wrap dough in plastic and refrigerate for 20 minutes to let the gluten relax.
  4. Remove dough from the refrigerator, unwrap, and dust lightly with flour. Roll out into a 9×18-inch rectangle about 1/4 inch thick. Evenly spread 6 tablespoons softened unsalted butter onto the middle third of the dough. Fold one unbuttered third over the buttered third and press lightly; spread the remaining 6 tablespoons of the unsalted button on top of that third. Fold remaining third over the first (buttered) third. Transfer dough onto a sheet pan, cover lightly with plastic wrap and a kitchen towel and refrigerate 20 to 30 more minutes for the butter to become firm. Sprinkle dough lightly with flour as you work if it becomes sticky.
  5. Return dough to the floured work surface and pat very gently into an 8×14 rectangle about 1/2-inch thick. Fold outer thirds over center third as before; roll out into an 8×14-inch rectangle again. Keep edges of the rectangle as straight as possible. Fold in thirds as before. Cover dough lightly with a kitchen towel, and refrigerate for 2 hours.
  6. Roll the dough out to about 3/8 inch thick. Cut dough in half crosswise. Leave half on a lightly floured work surface; refrigerate another half of dough until needed.
  7. Use a sharp 3-inch circular cutter to cut 8 circles of dough from a piece on the work surface. Use a 1-inch size cutter to cut the donut holes out of the dough circles.
  8. Line a baking sheet with waxed paper and sprinkle lightly with flour. Arrange cronuts and holes onto the prepared baking sheet. Let rise in a draft-free, warm place (such as an unheated oven) until doubled in size, about 1 hour.
Skip to toolbar